
One of the great things about WordPress is the huge choice of available plug-ins. Even those with only rudimentary technical skills can easily add functionality to a website. Such functionality even a few years ago would have been a technical challenge and a costly exercise. These days, it can often be achieved at very little, if any, cost.
But, some times it can be difficult to get those plug-ins to play nicely together. For example, suppose you want to use WooCommerce to handle your online sales and you want to use WSDesk to handle customer support. Both of these products are great right out of the box. But ensuring your customer has a clean navigation route from their Account Dashboard to the WSDesk ticket system does require a few tricks.
I’m going to walk you through how to add a Customer Support menu item into the standard WooCommerce Account Manager and how to render the support solution in-line within the Account Management area. I’m assuming you already have both WooCommerce and WSDesk installed (see links above if you don’t).
WooCommerce Account Dashboard
Let’s start with WooCommerce. Out of the box, when your customer’s visit their Account page they are presented with options similar to these (exact options available may vary with options and extensions chosen).
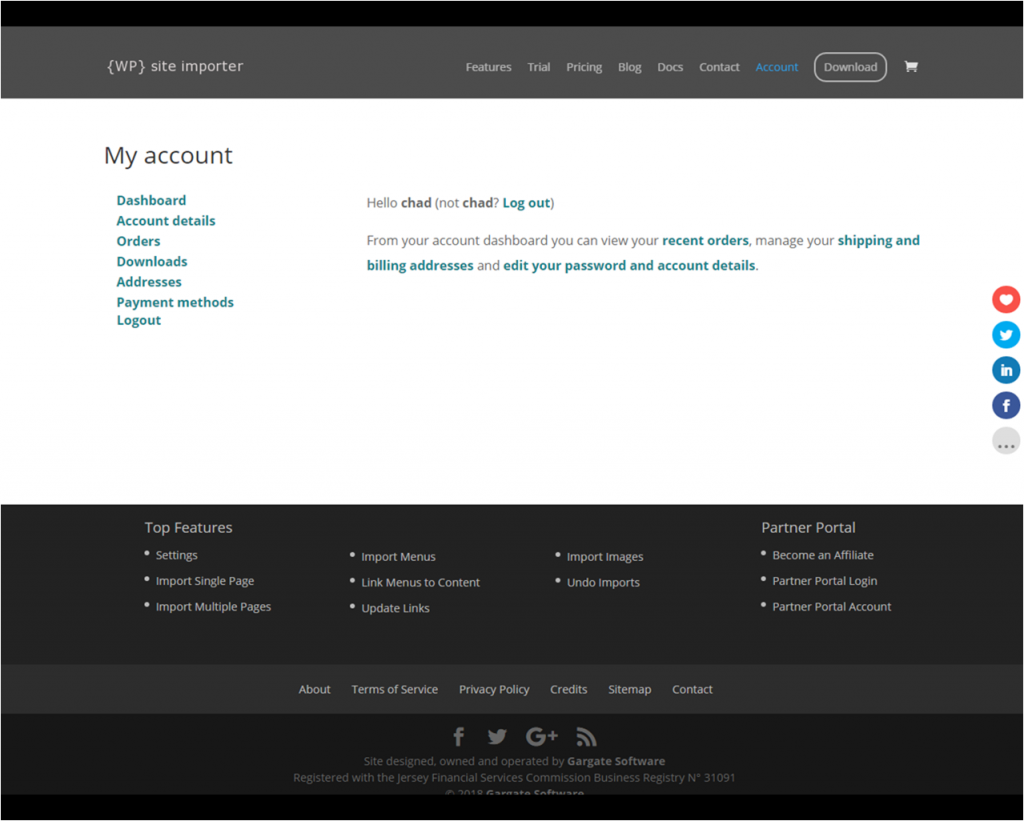
The WooCommerce Account Management Panel
It’s clean, simple and intuitive. Wouldn’t it be great if the Customer Support option appeared in the same place? Wouldn’t it also be good if the process to raise and review tickets all then took place in the main panel so we didn’t need to leave the page?
Adding Customer Support Options to WooCommerce
Ideally, we want to end up with a new menu option, Customer Support, embedded within the standard menu. So, when the use clicks the Customer Support option, they see this:
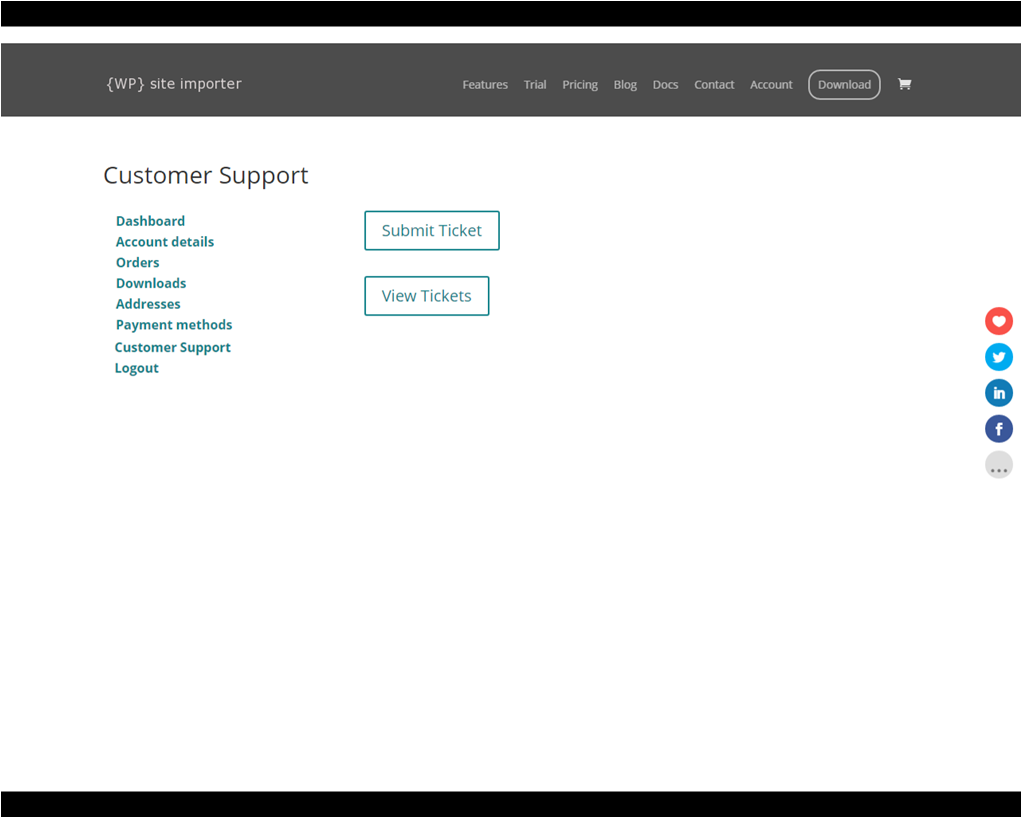
The WooCommerce Account Management Panel with Customer Support Menu Item
Raising a New Ticket
This would then allow us to raise a new ticket thus, without leaving the page:
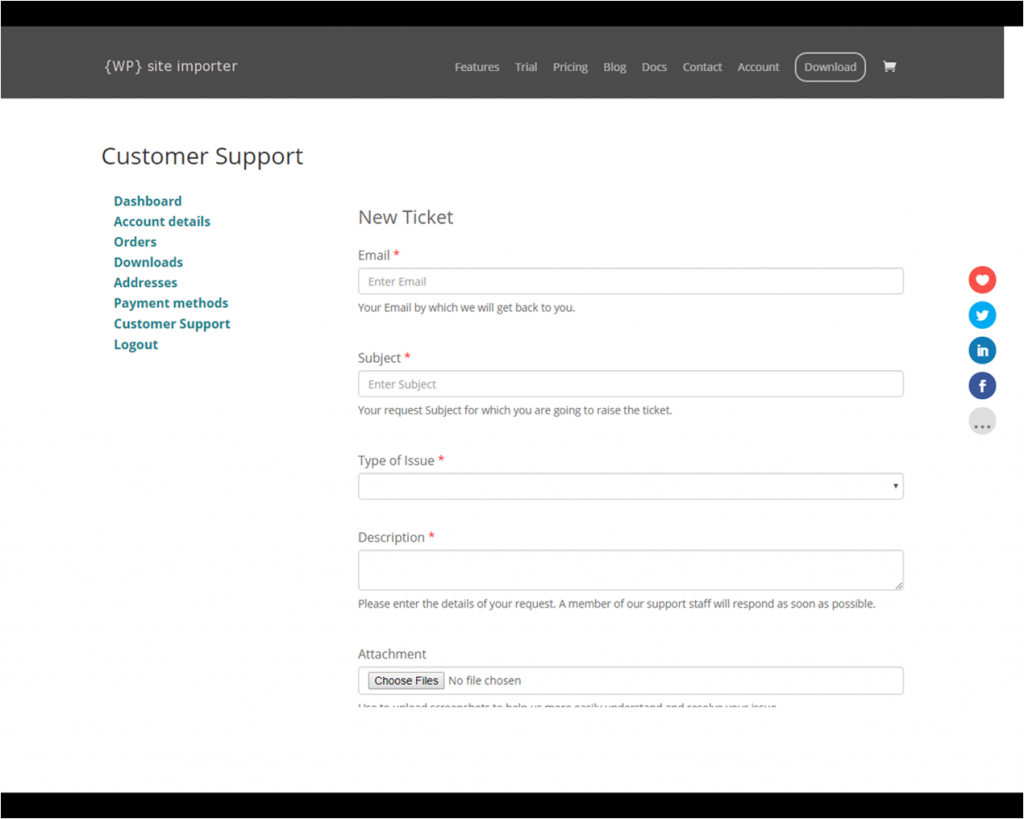
Raising a Support Ticket within the WooCommerce Account Management Area
Reviewing Existing Tickets
And review older tickets, also without leaving the page:
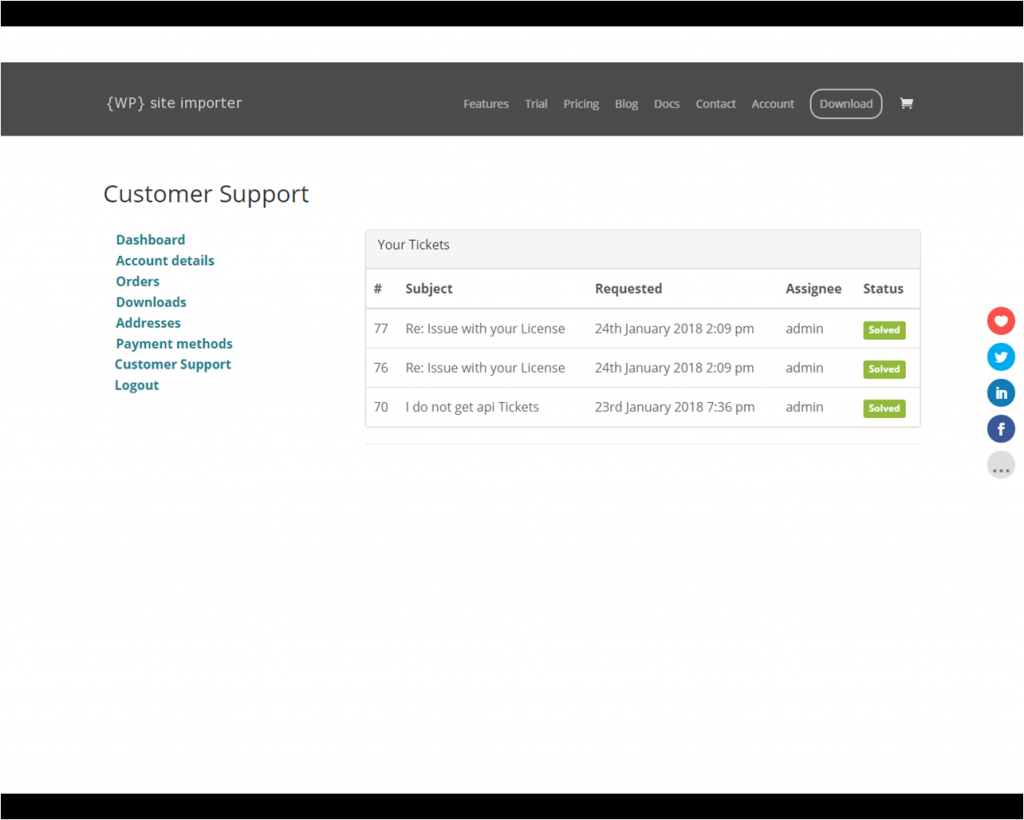
Reviewing Support Tickets within the WooCommerce Account Management Panel
Extending WooCommerce
Fortunately, WooCommerce is extremely flexible and it is pretty straight forward to achieve this. There are a few separate things we need to do but individually they are very simple:
- Initialise your custom WooCommerce end point;
- Add your custom query var;
- Add a flush handler in case the theme is switched;
- Insert your menu item;
- Deliver content for your custom end point;
- Change the end point title.
All of the above takes place in your functions.php.
Let’s walk through the code for these:
Step 1 – Custom WooCommerce End Point
This simply lets WooCommerce know to expect an extra end-point which we’re calling ‘customer-support’.
// 1. Register new endpoints to use inside My Account page.
add_action( 'init', 'my_woocommerce_custom_endpoints' );
function my_woocommerce_custom_endpoints() {
   add_rewrite_endpoint( 'customer-support', EP_ROOT | EP_PAGES );
}
Step 2 – Query Var Management
This tells WooCommerce it will need to handle URLs with ‘customer-support’ in them.
// 2. Add new query vars.
add_filter( 'query_vars', 'my_woocommerce_custom_query_vars', 0 );
function my_woocommerce_custom_query_vars( $vars ) {
   $vars[] = 'customer-support';
   return $vars;
}
Step 3 – Flush management
This just ensures that if we switch themes, we won’t lose our end-point.
// 3. Flush rewrite rules on theme activation.
add_action( 'after_switch_theme', 'my_woocommerce_custom_flush_rewrite_rules' );
function my_woocommerce_custom_flush_rewrite_rules() {
   add_rewrite_endpoint( 'customer-support', EP_ROOT | EP_PAGES );
   flush_rewrite_rules();
}
Step 4 – Menu management
This creates a new array of menu items, based on the existing array, but inserting our new menu item. Note that there are other more elegant ways of doing this, which will simply insert the new menu item. However, for any novices reading this, I felt this was the most intuitive way.
// 4. Insert the new endpoint into the My Account menu.
add_filter( 'woocommerce_account_menu_items', 'my_woocommerce_custom_account_menu_items' );
function my_woocommerce_custom_account_menu_items( $items ) {
   $ordered_items = array();
   $ordered_items['dashboard']=$items['dashboard'];
   $ordered_items['edit-account']=$items['edit-account'];
   $ordered_items['orders']=$items['orders'];
   $ordered_items['downloads']=$items['downloads'];
   $ordered_items['edit-address']=$items['edit-address'];
   $ordered_items['payment-methods']=$items['payment-methods'];

   // Insert your custom endpoint.
   $ordered_items['customer-support'] = __( 'Customer Support', 'woocommerce' );

   // Insert back the logout item.
   $ordered_items['customer-logout'] = $items['customer-logout'];
   return $ordered_items;
}
Step 5 – WSDesk Support Ticket HTML Rendering
This step is very simple because all we really need to output is the WSDesk short code.
// 5. Customer Support HTML content.
add_action( 'woocommerce_account_customer-support_endpoint', 'my_woocommerce_custom_customer_support_endpoint_content' );
function my_woocommerce_custom_customer_support_endpoint_content() {
    echo do_shortcode('[wsdesk_support]');
}
Step 6 – Change the Title
WooCommerce displays a title above the menu options which indicates which page you are viewing. This code simply re-titles the page whilst we are viewing Customer Support options.
// 5. Change endpoint titles.
add_filter( 'the_title', 'my_woocommerce_custom_endpoint_title' );
function my_woocommerce_custom_endpoint_title( $title ) {
   global $wp_query;
   $is_endpoint = isset( $wp_query->query_vars['customer-support'] );
   if ( $is_endpoint && ! is_admin() && is_main_query() && in_the_loop() && is_account_page() ) {
      // New page title.
      $title = __( 'Customer Support', 'woocommerce' );
      remove_filter( 'the_title', 'wpsi_woocommerce_custom_endpoint_title' );
   }
   return $title;
}
With that code, you should now have an integrated Customer Support solution within your WooCommerce account management page.
You may want to adjust the CSS a little. By way of an example, here is the style we use on this site. This should be entered in your “style.css” file…
.wsdesk_wrapper .btn {
   position: relative !important;
   padding: .3em 1em !important;
   border: 2px solid !important;
   -webkit-border-radius: 3px !important;
   -moz-border-radius: 3px !important;
   border-radius: 3px !important;
   background-color: transparent !important;
   background-repeat: no-repeat !important;
   background-position: center !important;
   background-size: cover !important;
   font-size: 20px !important;
   font-weight: 500 !important;
   line-height: 1.7em!important;
   -webkit-transition: all .2s !important;
   -moz-transition: all .2s !important;
   transition: all .2s !important;
   color: #13828a !important;
}
.wsdesk_wrapper .btn:after{
   position: absolute !important;
   margin-left: -1em !important;
   opacity: 0 !important;
   text-shadow: none !important;
   font-family:ETmodules !important;
   font-size: 32px !important;
   font-weight: 400 !important;
   font-style: normal !important;
   font-variant: none !important;
   line-height: 1em !important;
   text-transform: none !important;
   content: "\35";
   -webkit-transition: all .2s !important;
   -moz-transition: all .2s !important;
   transition: all .2s !important;
}
.wsdesk_wrapper .btn:hover:after{
   margin-left: 0 !important;
   opacity: 1 !important;
}
.wsdesk_wrapper .btn:hover{
   padding: .3em 2em .3em .7em !important;
   border: 2px solid transparent !important;
   background-color: rgba(0,0,0,.05) !important;
}
Summing Up
Integrating WSDesk and WooCommerce is pretty straight forward. A few simple functions and a little CSS is all that’s required and the customer’s journey is consistent and intuitive.
Of course, you don’t need to stop here. There are plenty of other plug-ins that can easily be integrated with WooCommerce in this way.
If you have any suggestions or thoughts on this, please drop us a note in the comments box.
Hi There,
This was literally the only webpage i could find on this subject and is exactly what i want to acheive!
I can get the end point inserted and it redirects to the form correctly.
But, it takes me to a new page rather than rendering the content within the account window as shown in your screenshots?
My Support page has a URL of simply “support” rather than “customer-support” so i’ve changed all references in the code to as the below….
Would massively appreciate any guidance!
// 1. Register new endpoints to use inside My Account page.
add_action( ‘init’, ‘my_woocommerce_custom_endpoints’ );
function my_woocommerce_custom_endpoints() {
add_rewrite_endpoint( ‘support’, EP_ROOT | EP_PAGES );
}
// 2. Add new query vars.
add_filter( ‘query_vars’, ‘my_woocommerce_custom_query_vars’, 0 );
function my_woocommerce_custom_query_vars( $vars ) {
$vars[] = ‘support’;
return $vars;
}
// 3. Flush rewrite rules on theme activation.
add_action( ‘after_switch_theme’, ‘my_woocommerce_custom_flush_rewrite_rules’ );
function my_woocommerce_custom_flush_rewrite_rules() {
add_rewrite_endpoint( ‘support’, EP_ROOT | EP_PAGES );
flush_rewrite_rules();
}
// 4. Insert the new endpoint into the My Account menu.
add_filter( ‘woocommerce_account_menu_items’, ‘my_woocommerce_custom_account_menu_items’ );
function my_woocommerce_custom_account_menu_items( $items ) {
$ordered_items = array();
$ordered_items[‘dashboard’]=$items[‘dashboard’];
$ordered_items[‘edit-account’]=$items[‘edit-account’];
$ordered_items[‘orders’]=$items[‘orders’];
$ordered_items[‘downloads’]=$items[‘downloads’];
$ordered_items[‘edit-address’]=$items[‘edit-address’];
$ordered_items[‘payment-methods’]=$items[‘payment-methods’];
// Insert your custom endpoint.
$ordered_items[‘support’] = __( ‘Customer Support’, ‘woocommerce’ );
// Insert back the logout item.
$ordered_items[‘customer-logout’] = $items[‘customer-logout’];
return $ordered_items;
}
// 5. Customer Support HTML content.
add_action( ‘woocommerce_account_support_endpoint’, ‘my_woocommerce_custom_support_endpoint_content’ );
function my_woocommerce_custom_support_endpoint_content() {
echo do_shortcode(‘[wsdesk_support]‘);
}
// 5. Change endpoint titles.
add_filter( ‘the_title’, ‘my_woocommerce_custom_endpoint_title’ );
function my_woocommerce_custom_endpoint_title( $title ) {
global $wp_query;
$is_endpoint = isset( $wp_query->query_vars[‘support’] );
if ( $is_endpoint && ! is_admin() && is_main_query() && in_the_loop() && is_account_page() ) {
// New page title.
$title = __( ‘Customer Support’, ‘woocommerce’ );
remove_filter( ‘the_title’, ‘wpsi_woocommerce_custom_endpoint_title’ );
}
return $title;
}
Caching issue caused the first example (why I always forget that I don;’t know)
Using the same code though as the form appears correctly now, when I submit an entry from the form the web address updates with the data thats been input but no form has been submitted?
It’s like it wants to take me somewhere and post the ticket but it fails and the page refreshes??
I’m the same as Darren, grateful for this tutorial, but the form does not appear embedded into the My Account page. Tried flushing cache, redid the code. but still to no avail. Would be nice to see why.
I found out the problem. When you have finished adding all the code into functions.php, you need to go to WordPress/Settings/Permalinks, then press “Save”. This flushes the permalinks and does all the re-write rules. It now shows up as an embedded page.
Cheers